
How to Turn a Photo into Canvas Art: Easy Steps
Key Takeaways
- You can turn any high-quality photo into canvas art by choosing the right image, prepping it at 150–300 DPI, selecting the best size and edge wrap, and ordering from a reputable print service;
- The most common pitfalls are low resolution, poor cropping for gallery wraps, and choosing a size that does not fit your wall or viewing distance;
- DIY canvas projects can work for small, budget-friendly pieces, but professional printing delivers the most durable, color-accurate results;
- Prefer a modern, nail-free approach? Mixtiles turns your photos into lightweight, repositionable wall art, perfect for a canvas-style look without tools or wall damage.
Turning treasured shots into canvas art is easier than you think. With the right image, a few simple file-prep steps, and a smart choice of size and edge wrap, you can order a stunning, gallery-style canvas print in minutes. This guide explains how to turn a photo into canvas art from start to finish, including resolution, size, and finishes. If you want the canvas look without nails or guesswork, you will also see how Mixtiles makes it easy to create a beautiful gallery wall at home.
Ready to create your wall art? Start on our website to upload a photo, preview layouts, and order beautiful, repositionable photo tiles today.
What’s the simplest way to turn a photo into canvas art?
The fastest route is to use a professional canvas print service for consistent quality and a ready to hang result. If you love crafting, you can try a DIY canvas for small, low-cost projects, but results vary with materials and technique. Still choosing between materials? Compare acrylic print vs canvas to find the look and durability that fit your space.
Here is a quick, reliable process that most people follow successfully:
- Choose your best image, one that is sharp and well lit with clean composition;
- Export at 150–300 DPI in sRGB as a high-quality JPEG, then check a live preview for cropping and edge wrap;
- Select a canvas size that fits your wall and viewing distance, then pick an edge style: mirrored, colored, or image wrap;
- Place your order with a trusted printer that uses archival inks on artist-grade material with solid wood stretcher bars;
- Hang carefully with the included hardware, or if you prefer no nails, choose Mixtiles Canvas Tiles that stick and re-stick cleanly.
Which photos work best on canvas?

Photos with bold subjects, good contrast, and minimal clutter make the strongest custom canvas prints. Portraits, family pictures, pet photos, landscapes, wedding images, and travel scenes all translate beautifully when they are sharp and properly exposed.
Composition and subject
Keep the subject clear and central, and simplify the background so your eye lands where it should. Strong color or classic black and white both work well. Avoid heavy noise, extreme crops, or soft focus that will look worse when enlarged.
Resolution and sharpness
Aim for 150–300 DPI at the final size. A simple rule: multiply the canvas print dimension in inches by 150 or 300 to get minimum pixels on each side. For example, a 16 by 20 canvas needs about 2400 by 3000 pixels at 150 DPI, or 4800 by 6000 pixels at 300 DPI.
How to prep photo file so it prints crisply?
Export your file at the final print size in sRGB, check cropping around the edges, and apply gentle sharpening. Avoid aggressive upscaling, because it can introduce artifacts that reduce quality.
Sizing and DPI
Export at 300 DPI for smaller prints viewed up close, or 150 DPI for large prints viewed from farther back. You can save time by exporting at the final size or slightly larger.
Color space and file type
Most labs expect sRGB and a high-quality JPEG. PNG is acceptable if requested. sRGB helps preserve consistent color on different displays and in printing.
Cropping and wrap safety
Keep important details at least 1 to 2 inches from each edge so they do not wrap around the sides. If you choose mirrored or black or white edges, review the preview to confirm the face of the image stays intact.
Finishing touches
Refine exposure and white balance, remove dust spots, and add light capture or output sharpening. A subtle monochrome conversion can be a great style for timeless wall art.
What canvas size should you choose for your space?

Pick sizes based on viewing distance and the furniture around the display. Small prints suit gallery walls and desks, medium sizes work well as singles, and large formats make a dramatic statement above a sofa or bed.
Match size to viewing distance
Choose 8 by 10 or 12 by 12 for small areas and collage layouts. Go 16 by 20 or 18 by 24 for versatile singles or pairs in living rooms and offices. Select 24 by 36, 27 by 36, or 30 by 40 for bold, large wall art that anchors a room.
Quick pixel guidance by common sizes
Use this table to estimate the minimum image size you need for clean results. Metric dimensions are included for planning your gallery wall.
|
Canvas Size (in) |
Canvas Size (cm) |
Min Pixels at 150 DPI |
Min Pixels at 300 DPI |
|---|---|---|---|
|
12 × 12 |
30.5 × 30.5 |
1800 × 1800 |
3600 × 3600 |
|
16 × 20 |
40.6 × 50.8 |
2400 × 3000 |
4800 × 6000 |
|
20 × 27 |
50.8 × 68.6 |
3000 × 4050 |
6000 × 8100 |
|
24 × 36 |
61.0 × 91.4 |
3600 × 5400 |
7200 × 10800 |
|
27 × 36 |
68.6 × 91.4 |
4050 × 5400 |
8100 × 10800 |
If your image sits slightly below these numbers, select a smaller size, or plan to hang farther back to keep prints looking crisp. For room-by-room recommendations and a quick reference, bookmark our canvas size chart.
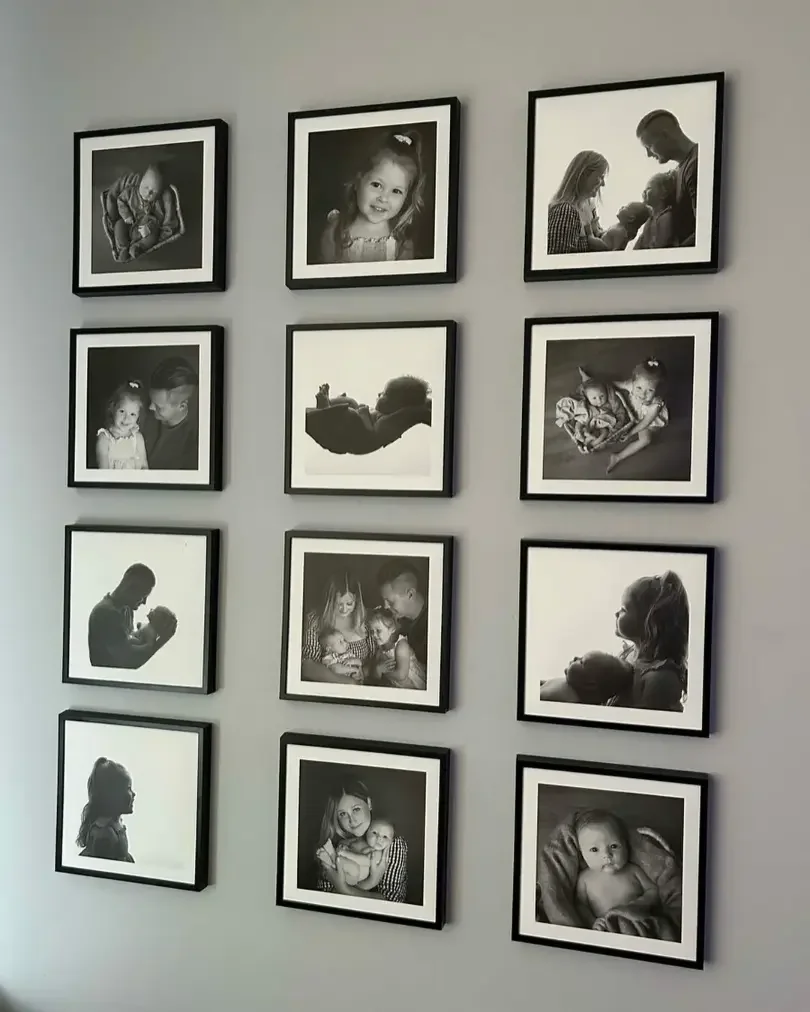
Prefer an easier, nail-free upgrade? With Mixtiles, you can preview a stunning photo gallery wall and stick frames right to your wall. Explore our wall arts collection for inspiration. No tools, no damage, and you can reposition anytime.
Which edge wrap, frame, and finish should you pick?
Choose an edge and finish that suits your image and room lighting. The right combination protects prints for years and complements your style.
Edge styles
Mirrored edges flip the photo sides for a seamless gallery wrap that preserves the full face of the image. Black or white edges provide a clean border that works well with tight crops. Full image wrap extends content around the sides, so keep important details away from borders.
Frame depth and look
Most ready to hang canvas prints use a gallery wrap around 1.25 inches deep on wood stretcher bars. Deeper wraps feel more substantial, while thinner wraps feel minimal and light.
Finish and protection
Matte finishes reduce glare and suit most homes and offices. Archival, UV-resistant inks help resist fading for years. Avoid direct sun and high humidity for best longevity.
Should you use a pro lab or try a DIY canvas?
For most people, a pro lab gives the best mix of quality and convenience. DIY is fun for small experiments and gifts if you enjoy crafting and accept a variable finish.
Pro lab (best for quality and convenience)
You get true color management, tight stretching, durable materials, and a clean, ready to hang product. Pricing is higher than DIY, yet you save time and reduce risk, especially for large prints and wedding or family gifts.
DIY (good for small, crafty projects)
Common methods include mounting a photo print to a canvas panel with matte gel, or using a gel-transfer technique. This is creative and low cost, but there is a learning curve and results can vary in texture and durability.
How do you hang and care for canvas prints?
Follow the hardware instructions that arrive with your canvas print, then maintain gentle cleaning habits. Good hanging and care keep your wall art looking beautiful for years.
Hanging
Use the included sawtooth or wire hardware. For large or heavy pieces, use wall anchors into drywall or a stud. Renters can consider command strips rated for the canvas weight. Always center and level before final placement. Get step-by-step tips in our guide on how to hang canvas art on a wall.
Care and longevity
Dust lightly with a dry microfiber cloth. Avoid water, cleaning sprays, and long exposure to direct sunlight. Keep canvases away from high humidity areas unless your product is rated for those spaces. If you notice smudges or buildup, follow our tutorial on how to clean a canvas painting without damaging the surface.
Want the canvas look without nails or guesswork? Try Mixtiles

Mixtiles Canvas Tiles are printed on premium material and arrive ready to stick and re-stick. Upload on the app or website, choose a style like framed or frameless canvas, add a printed border if you like, and build a custom gallery wall with zero tools. You can mix sizes, add a Wall Sign for a personal touch, or create a coordinated set using our Gallery Wall Kits. Looking for other formats? Explore photo prints, fine art, and photo books for thoughtful gifts.
Now you know how to turn a photo into canvas art: pick a strong image, prep it at 150–300 DPI, choose the right size and edge, and print with a trusted service. If you want a modern, renter-friendly alternative, Mixtiles makes wall art easy to create, easy to hang, and easy to rearrange as your home and style evolve.
Ready to turn your photos to canvas? Start on our website, choose your favorite style, and enjoy beautiful, nail-free art delivered to your door.
Frequently Asked Questions
Can I turn any photo into a canvas print?
Yes, as long as the image is sharp and high resolution. Aim for 150 to 300 DPI at the final size, use sRGB, and avoid tight crops near the edges. Bold subjects, clean composition, and good lighting produce the most striking results.
Where can I get a photo printed on canvas?
You can order from online photo labs, local photo centers, or professional print studios. Compare materials, edge options, turnaround, and return policies. Prefer a renter-friendly display? Mixtiles Canvas Tiles deliver a canvas-style look that sticks to walls, no nails required.
Can AI convert my photo to a painting before printing on canvas?
Yes. Use an AI art app or editing software to apply a painting style, then export a high-resolution sRGB JPEG at 150 to 300 DPI. Upload that file to your canvas printer, or choose Mixtiles Canvas Tiles for an easy, repositionable display at home.
Be the first to know — deals, news & decor ideas.
By clicking you agree to the Terms of Use & Privacy Policy