
DIY Large Wall Art: Budget-Friendly Ideas Without Damage
Key Takeaways
- Oversized art is achievable on a budget using canvas frames, drop cloths, engineering prints, or modular photo tiles, so you get a designer look without the designer price;
- Start with measurements and scale, then plan placement and spacing to make your DIY large wall art feel intentional and proportional to your furniture;
- Renter-friendly options like Mixtiles let you create gallery-scale statements with zero tools, no nails, and damage-free repositioning;
- Blend quick wins such as engineering prints or fabric tapestries with long-lasting builds like custom canvases to match your time, skill, and budget.
Big art makes small rooms feel curated and large rooms feel finished, but oversized pieces can be pricey. The good news is simple. With a little planning, you can create DIY large wall arts that look high-end without spending a fortune or drilling holes. From canvas builds and drop-cloth paintings to engineering prints and modular photo tiles, this guide shows you how to plan, build, and hang statement art you will love, and can move any time.
Ready to create a large-scale statement? Design a stunning picture wall in minutes. Our photo tiles go up without nails, so you can start on the Mixtiles app or our website.
What counts as DIY large wall art, and why does scale matter?
DIY large wall art is any handmade or self-assembled piece that visually reads as oversized. Think single canvases from 24 by 36 inches and up, multi-panel sets that span most of a sofa, or a grid of photo tiles that functions as one big artwork. Scale matters because the right proportions anchor your room, balance your furniture, and make your space feel intentionally designed.
Typical sizes that read “large” at home
For single pieces, 24 by 36 inches is a common starting point, while 27 by 36 inches and 22 by 44 inches feel dramatic and modern. Multi-panel art like diptychs and triptychs often total 48 to 90 inches in width. Grids of square tiles, for example a 3 by 3 or 4 by 3 layout, create a clean, gallery-scale statement that reads as one piece from a few steps away.
The 60 to 75 percent rule for proportion
As a quick sizing shortcut, aim for artwork that is roughly 60 to 75 percent of the width of the furniture it hangs above. If your sofa is 84 inches wide, your art should span about 50 to 63 inches. This keeps the composition balanced and avoids the common mistake of choosing art that is too small.
Height and sightlines
For most homes, center art at 57 to 60 inches from the floor. If you are hanging above a sofa or headboard, keep the bottom edge 6 to 10 inches above the top of the furniture. These sightline rules keep your large DIY wall art feeling connected to the rest of the room.
How big should your DIY art be for your space?
Match the width of your art to the furniture or wall span, then pick a layout that suits how you use the room. As a rule of thumb, oversize pieces and grids should fill at least two thirds of the available width. Use the table below to find quick size targets and example layouts that work for common rooms:
|
Room scenario |
Furniture width |
Recommended art width |
Example single piece |
Example Mixtiles grid width |
|---|---|---|---|---|
|
Above 72 in sofa |
72 in, 183 cm |
43 to 54 in, 109 to 137 cm |
27 × 36 in, 69 × 91 cm |
3 × 3 of 12 in tiles with 2 in gaps, about 40 in, 102 cm |
|
Above 84 in sofa |
84 in, 213 cm |
50 to 63 in, 127 to 160 cm |
22 × 44 in, 56 × 112 cm |
4 × 3 of 12 in tiles with 2 in gaps, about 54 in, 137 cm |
|
Queen bed with 60 in headboard |
60 in, 152 cm |
36 to 45 in, 91 to 114 cm |
20 × 27 in, 51 × 69 cm |
3 × 2 of 12 in tiles with 2 in gaps, about 40 in, 102 cm |
|
Dining console at 72 in |
72 in, 183 cm |
43 to 54 in, 109 to 137 cm |
27 × 36 in, 69 × 91 cm |
4 × 3 of 8 in tiles with 1.5 in gaps, about 37 in, 94 cm |
Living room and above-sofa guidelines

Art should span at least two thirds of your sofa’s width. For 72 to 90 inch sofas, target 43 to 68 inches of total art width. Keep the bottom edge 6 to 8 inches above the back cushion so it feels connected to seating without crowding it.
For more layout inspiration that works at scale, explore our large living room wall decor ideas.
Bedroom above the bed

For a queen headboard around 60 inches wide, aim for 36 to 45 inches in total width. For a king around 76 inches, aim for 46 to 57 inches. Keep the bottom edge 8 to 10 inches above the headboard so your pillows do not touch the art.
For makeover-ready tips and layouts, see our wall decor ideas for bedroom makeovers.
Dining room and entryway

In dining rooms, you can go wider for drama, especially opposite windows. Entryways often benefit from tall compositions or grids that visually stretch narrow walls. If the wall feels long, center the art over a console or choose a grid to fill the span evenly.
Get more table-to-wall styling inspiration in our dining room wall decor ideas.
Measuring and mockups
Before you commit, mock up your idea with painter’s tape or paper cutouts. Many phones include augmented reality rulers that help you preview size on the wall. If you are designing a Mixtiles grid, arrange tiles on the floor, then transfer the plan to the wall using a tape measure and light pencil marks you can erase.
Which DIY large wall art ideas match your time, skills, and budget?
You have options. If you want results today, try engineering prints or a Mixtiles grid. If you are up for a weekend build, make a drop-cloth canvas or a stenciled geometric. If you love woodworking, build a custom stretched canvas with a floating frame. Pick the path that fits your skills and schedule.
For even more step-by-step projects and creative prompts, browse our curated DIY wall art ideas.
Fast and affordable, beginner friendly
Order an oversized black and white engineering print from a local print shop and pop it into a lightweight frame. Another speedy idea is hanging a fabric tapestry or rug from a wood dowel. You can also repaint a thrifted canvas with gesso, then create a minimalist abstract with two or three colors for a modern look.
Weekend projects with a polished finish
Stretch a painter’s drop cloth over a simple 1 by 2 frame, then paint sweeping gestures or calm color fields. Try stenciled or taped geometries for crisp edges. Build a picture wall using several frames or create the same effect with modular photo tiles that align perfectly without tools.
High impact modular approach for renters
Mixtiles grids give you a gallery wall without nails. Tiles are lightweight, framed without glass, and use stick and restick tech or a magnet system. Reposition them any time to adjust spacing or try a new layout. It is the simplest path to large DIY wall art in apartments and dorms.
Advanced builds for makers
Construct a large canvas frame with 1 by 2 or 1 by 3 lumber, miters at 45 degrees, then add corner braces. Stretch primed cotton canvas and finish with a slim floating trim for dimension. If mounting a textile or rug, hand stitch at intervals so the fabric lies flat, then add edge trim for a gallery-ready feel.
What materials and tools will you need for common large-scale DIYs?
Materials vary by project, but you can keep it simple. For drop-cloth or canvas abstracts, you will need a painter’s drop cloth or primed canvas, acrylic or latex paint, a staple gun, and 1 by 2 or 1 by 3 lumber for the frame. A miter saw and drill make assembly fast, and a measuring tape keeps everything square.
For engineering prints, order a large black and white poster from a copy shop, then mount it to foam board and slip it into a lightweight frame. A craft knife, straightedge, and cutting mat help you achieve clean edges.
For textiles or lightweight rugs, use a dowel pocket or a slim wooden frame, then attach a hanging cord. A handheld drill, needle and thread, or a staple gun will cover most needs.
For a Mixtiles photo tile grid, you only need your photos. Tiles arrive ready to hang with built-in adhesive or wall magnets. No nails or tools are required, which is ideal for renters and refreshers.
How do you plan a layout so your large wall art looks designed, not random?
Choose a composition, commit to consistent spacing, and repeat colors or shapes for cohesion. Mock up before you hang. These simple habits turn a collection into a unified focal point that feels intentional in any room.
Pick the right composition
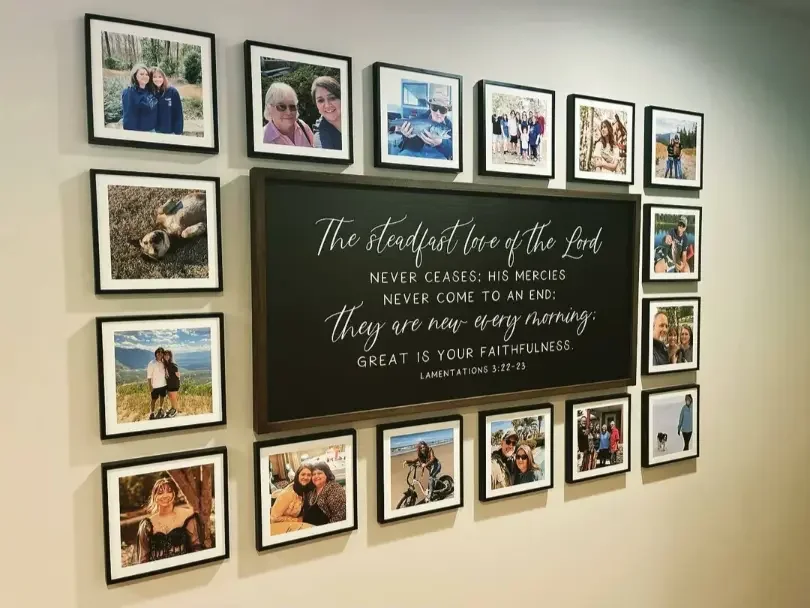
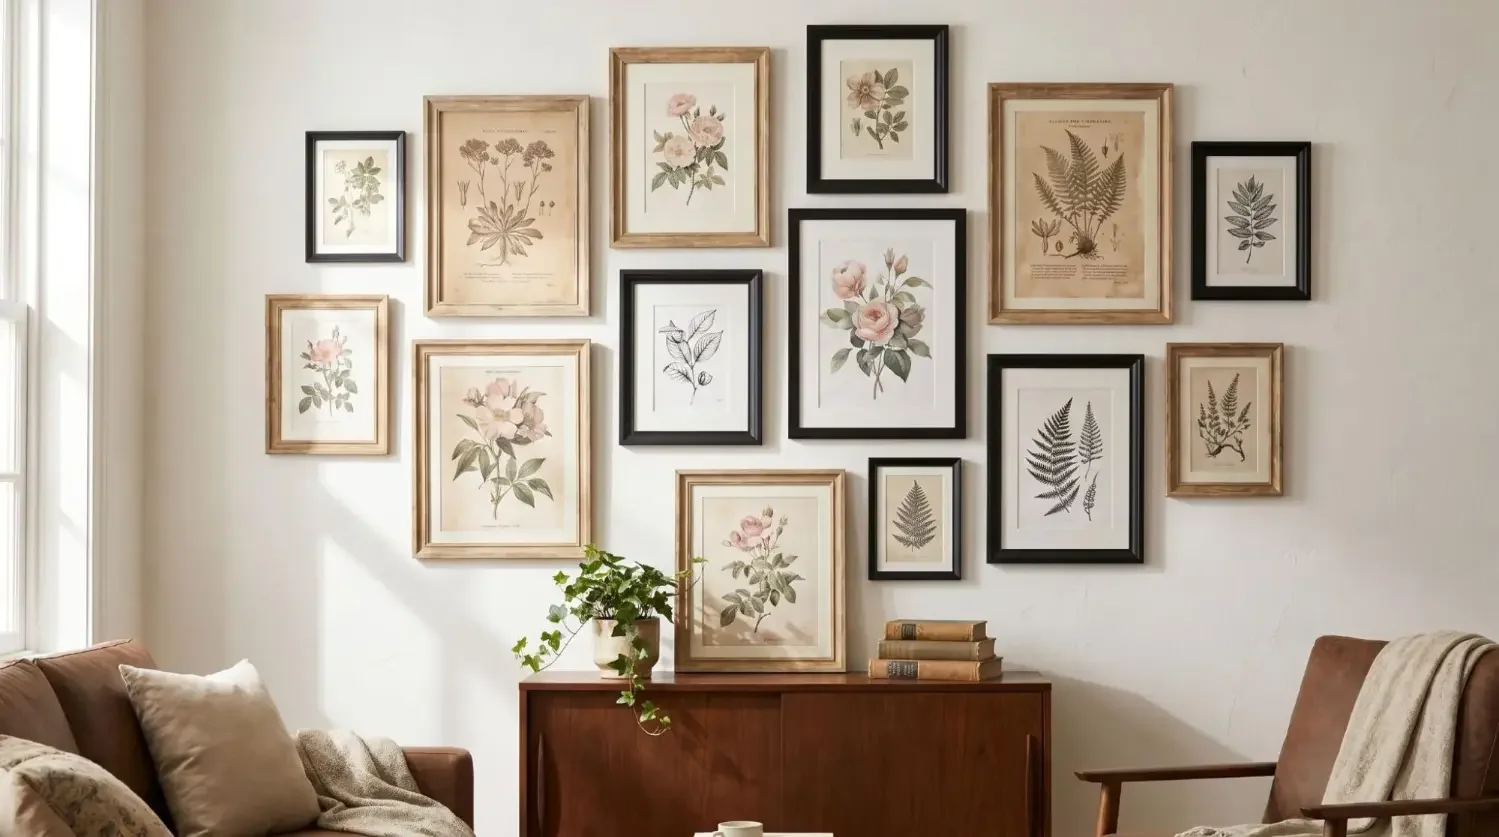
A single oversized piece feels calm and sculptural. Diptychs and triptychs read as one idea across multiple frames. Grids like 3 by 3, 4 by 3, or 4 by 4 give modern symmetry. Salon walls suit eclectic spaces, but still benefit from an anchor line and repeated tones.
Spacing rules that work every time
Leave 2 to 3 inches between frames or tiles in a grid so the composition breathes. Keep art 6 to 10 inches above furniture to connect it visually without crowding. For long walls, center the layout to the furniture beneath rather than the wall midpoint if the furniture is the focal anchor.
Color, contrast, and cohesion
Pick a dominant palette. Use neutrals to ground bold hues. Repeat one or two shapes or tones across the layout. A white or black border on every frame can unify mixed content. Mixtiles make this easy with consistent frame styles and optional printed borders that read like mats.
Proof your layout
Use painter’s tape to map frame outlines at full size, then step back and adjust. If you are building a Mixtiles grid, arrange and space tiles on the floor first, then transfer the plan. You can always restick tiles to perfect the spacing once they are on the wall.
Can you create DIY large wall art with your photos without drilling a single hole?
Yes. Mixtiles tiles are lightweight, adhesive, and repositionable, so you can build a gallery-scale grid in minutes and move it whenever you like. It is the fastest way to create large DIY wall art from your camera roll without tools, nails, or wall damage.
The Mixtiles method for DIY large wall art
Mixtiles turns your favorite photos into framed tiles that stick to walls cleanly and securely. Many tiles use the stick and restick adhesive. Others use a simple wall magnet and tile magnet system. Both options are renter friendly and designed to last for years.
Grid ideas that read as one big piece
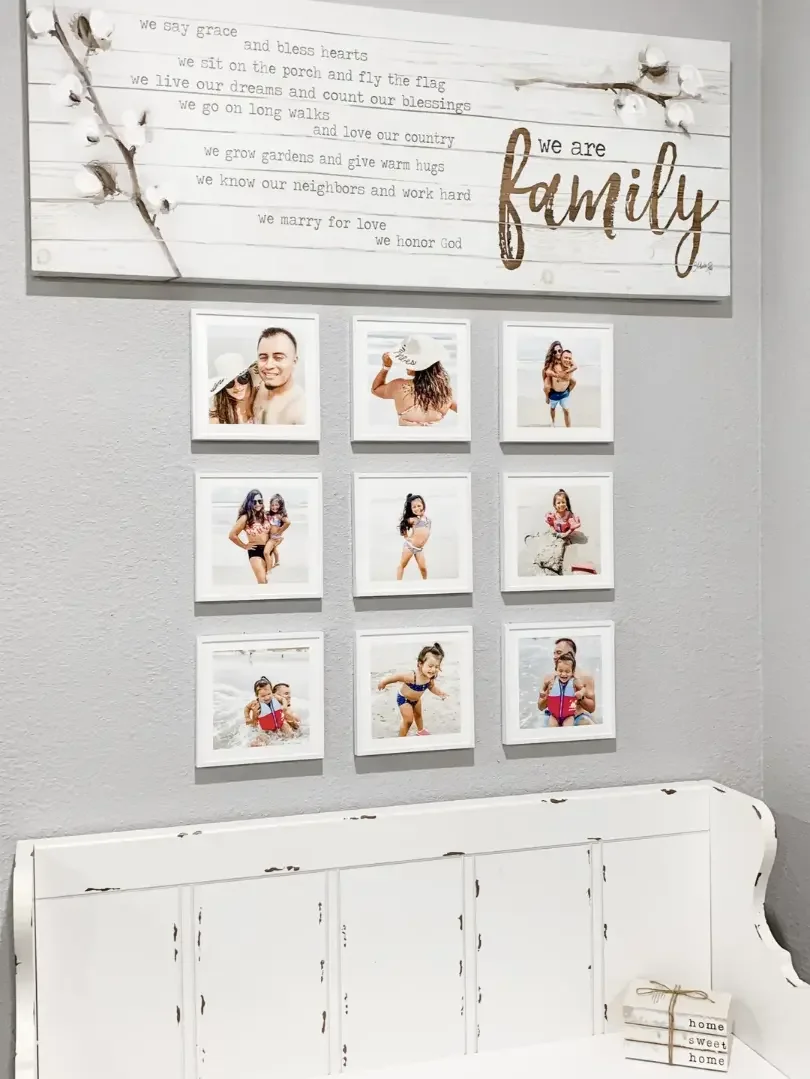
Try a 3 by 3 grid for a compact statement above a console. Use a 4 by 3 or 4 by 4 grid for living rooms. Another striking option is a panoramic split, where one wide image is divided across 6 to 12 tiles. Consistent frames and borders make the collection feel like a single artwork.
Choosing images that feel “large”
Minimalist landscapes, architectural lines, and bold abstracts scale beautifully. Family portraits with generous negative space look modern at size. If your room is colorful, black and white photography can calm the palette. If your room is neutral, go bold with color and texture.
Step by step: build a Mixtiles large wall in minutes
- Upload your photos and choose a tile style, for example Framed, Frameless, Wide Frame, or Canvas;
- Plan your grid size and spacing, then preview borders to unify the look;
- Place the first tile on the wall at your centerline, then align subsequent tiles using a level or spacer;
- Reposition tiles as needed until spacing is perfect, then step back and enjoy.
Turn your favorite photos into a large statement wall with Mixtiles picture tiles. They are the perfect solution for a no nails, no tools, no damage design. Start your grid now.
Want to build an oversized canvas? Here is the high-level plan.
You can build a big canvas with basic materials. Assemble a light wood frame, stretch primed canvas or a drop cloth, then add a slim trim for a gallery feel. Keep supports minimal if you plan to paint directly on canvas so nothing telegraphs through.
Frame fundamentals
Cut 1 by 2 or 1 by 3 lumber to length with 45 degree miters for corners. Glue and screw the rectangle, add corner braces, then a light center support for stability. The larger the frame, the more critical it is to keep everything square. A speed square and diagonal measurements help you confirm alignment before you stretch fabric.
Stretching canvas tips
Lay the canvas face down on a clean floor. Place the frame on top. Starting at the center of one side, pull the fabric taut and staple, then move to the opposite side and repeat. Work from centers toward the corners while alternating sides. Use a scrap board as a lever to pull tighter if needed. Small, consistent staples keep tension even.
Mounting textiles
For tapestries or rugs, test a small section to confirm the fabric will not distort. Hand stitch at intervals along the edges for a secure, invisible mount. For a clean finish, add a thin trim as a floating frame that stands proud of the face by a few millimeters.
Finish and hang
Sand and paint or stain the trim. Seal if needed. Keep the build as light as possible, which makes hanging easier and safer. If you prefer a no-hole approach, you can set the piece on a mantle or shallow ledge, or choose modular tiles for a similar scale with less weight.
Oversized canvas in five steps
- Decide final size, then cut and assemble a square frame with 45 degree corners;
- Add corner braces and a light center support to prevent bowing;
- Stretch primed canvas or a drop cloth, stapling from centers outward while alternating sides;
- Trim excess fabric, then add a slim wood trim as a floating frame if desired;
- Paint or mount your textile, let dry fully, then place the art using appropriate wall hardware or a ledge.
Which renter-friendly alternatives give you big impact with less effort?
For instant transformation, try a large drop-cloth abstract, an engineering print, a fabric wall hanging, or a Mixtiles grid. Each option delivers scale without heavy tools or permanent holes, and all can be styled to look curated and modern.
Drop-cloth abstract under 50 dollars
Prime a cotton drop cloth with gesso, staple it to a simple frame, then paint sweeping shapes with two to three colors. The texture of the cloth adds warmth and hides minor brush marks, which reads as intentional at large size.
Engineering print posters under 20 dollars per print
Convert a favorite phone photo to black and white, print it large, and mount it to foam board. Pop it into a thin black or natural wood frame. The soft halftone texture gives a trendy, editorial feel.
Fabric or rug wall hangings
Hang a patterned textile on a dowel for a relaxed look or frame it tight for a tailored finish. Oversized patterns or high contrast motifs feel right at scale and add instant personality.
Modular photo tiles with Mixtiles
Build your statement piece tile by tile. Refresh seasonally by swapping photos. Choose borders and frame styles for cohesion. If you want a zero-guesswork option, try Mixtiles Gallery Wall Kits with pre-curated layouts and templates that install quickly.
How do you pick colors, finishes, and subjects that feel upscale?
Limit your palette, add texture, and repeat visual cues across the layout. These decisions make even budget builds look elevated and intentional at large scale.
Palette strategies
Monochrome art feels calm and sophisticated. Complementary color pairs, for example blue and rust, create energy. Sample hues from your rug or pillows to lock the art into the room’s palette without matching everything exactly.
Texture and dimension
Use matte paint for a rich finish and add small metallic accents for highlights. Canvas texture, woven textiles, and raw wood frames add depth. With Mixtiles, consistent frame colors and optional printed borders mimic the look of matted gallery pieces.
Subjects that visually enlarge a space
Horizon lines, big brushy abstracts, graphic botanicals, and architectural details draw the eye outward. Negative space gives your wall room to breathe, which is especially helpful in small rooms or narrow halls.
Frame and border choices
Slim black or natural wood frames work with most styles. A consistent border across a grid reads tailored and collected. Mixtiles offers framed, frameless, wide frame, and canvas styles, plus printed borders that emulate a mat without adding weight.
Where should you hang large wall art for maximum impact?
Place art where your eye naturally lands. Anchor it to furniture or architectural features. When in doubt, pick the wall you face most often and give it the largest, most cohesive piece.
Living room focal wall

Over the sofa or opposite the seating area are both strong choices. A grid can span the sofa width in a way that feels tailored. Keep glare in mind and avoid direct reflections from windows when selecting finishes.
Bedroom calm zone

Above the headboard is the ideal spot. Choose serene subjects and soft palettes if you want a restful feel. A 3 by 2 or 3 by 3 grid of square tiles gives gentle rhythm and symmetry.
Dining room bold statements

Hang a bold single piece or a symmetrical grid where it balances windows and mirrors. Consider low glare finishes or canvas textures so the art reads well during daylight and evening meals.
Entryway first impression

Use a vertical composition or narrow grid to visually stretch small foyers. Align the art to a console or bench so the grouping feels connected and intentional.
Common mistakes to avoid and easy fixes
The most common pitfalls are choosing art that is too small, spacing inconsistently, and introducing too many competing colors. Scale up your composition, lock in even spacing, and simplify your palette. If damage worries hold you back, use adhesive and magnet based solutions like Mixtiles instead of nails.
Quick comparison: Which DIY path is right for you?
If you want results today, choose a Mixtiles grid, an engineering print, or repaint a thrifted canvas. If you want custom and crafted, paint a drop-cloth abstract, tape crisp geometric shapes, or build a stretched canvas. If you rent or refresh often, Mixtiles lets you restyle your wall without tools and without damage.
Safety and care tips for big wall art at home
Large pieces need stable mounting and gentle care. Keep these tips in mind so your DIY large wall art looks great for years and stays secure on different wall types.
- Match hanging method to weight and wall type, for example anchors for drywall, masonry hardware for brick, adhesives or magnets for lightweight tiles;
- Check weight limits on adhesives, and press firmly for several seconds to help bond on textured walls;
- Keep art away from direct steam, heavy humidity, and prolonged sunlight to avoid warping and fading;
- Dust frames and tiles with a dry, soft cloth, and avoid cleaning sprays or water on printed surfaces.
DIY large wall art does not have to be complicated or expensive. Whether you build a statement canvas, frame a dramatic tapestry, print a giant photo, or create a clean, modern grid with Mixtiles, scale and planning are what make your space feel designed. Start with your wall measurements, pick a layout you love, and choose the method that matches your time and budget. The result is big style with low stress.
Ready to go big without the build? Create your DIY-style large wall art with our personalized canvas prints. They hang in seconds and move whenever you want. Start designing on our website today.
Frequently Asked Questions
How do I choose the right size for DIY large wall art?
Use the 60 to 75 percent rule. Art should span 60 to 75 percent of the furniture width beneath it. Center art at 57 to 60 inches from the floor, or keep the bottom edge 6 to 10 inches above sofas or headboards. Fill at least two thirds of an empty wall.
What are the cheapest ways to create oversized art at home?
Try budget staples. Oversized engineering prints in black and white, painted drop-cloth canvases, repainted thrift-store art, fabric tapestries on a dowel, or lightweight photo tiles. Mount prints to foam board, use simple wood frames, limit colors to two or three for a modern look.
How can I hang large art in a rental without drilling?
Choose damage-free methods. Removable adhesive strips rated for your frame weight, adhesive photo tiles, hook-and-loop hangers, or a picture rail with cords. Clean the wall, follow cure times, press for several seconds, and avoid heavy texture, steam, or humidity. Test a small area first.
What resolution do my photos need for big prints?
For big prints, aim for 150 ppi at final size. A 24 by 36 inch print needs about 3600 by 5400 pixels. For viewing from several feet, 100 to 150 ppi often looks crisp. Use high-quality JPEG or TIFF, minimal compression, and gentle sharpening.
Be the first to know — deals, news & decor ideas.
By clicking you agree to the Terms of Use & Privacy Policy